在之前的探索中,我们已经实现了通过 gRPC 自主注册懒猫 SSO 应用,并成功集成了符合 OpenID Connect (OIDC) 协议的应用。今天我突发奇想:既然大家都是标准的 OIDC 协议,我能不能把“懒猫SSO”外挂到其他的身份提供商(IDP)里,作为一种身份联邦(Identity Federation)来使用?
如果这一步能走通,意味着我们可以实现用户系统的共享。说干就干,我选择了 AWS Cognito 作为认证中间层,尝试把懒猫SSO集成进去。
初探:环境配置与客户端注册 AWS Cognito 支持添加第三方 OIDC IDP。首先,我们需要在懒猫 SSO 中为 Cognito 注册一个“身份”。
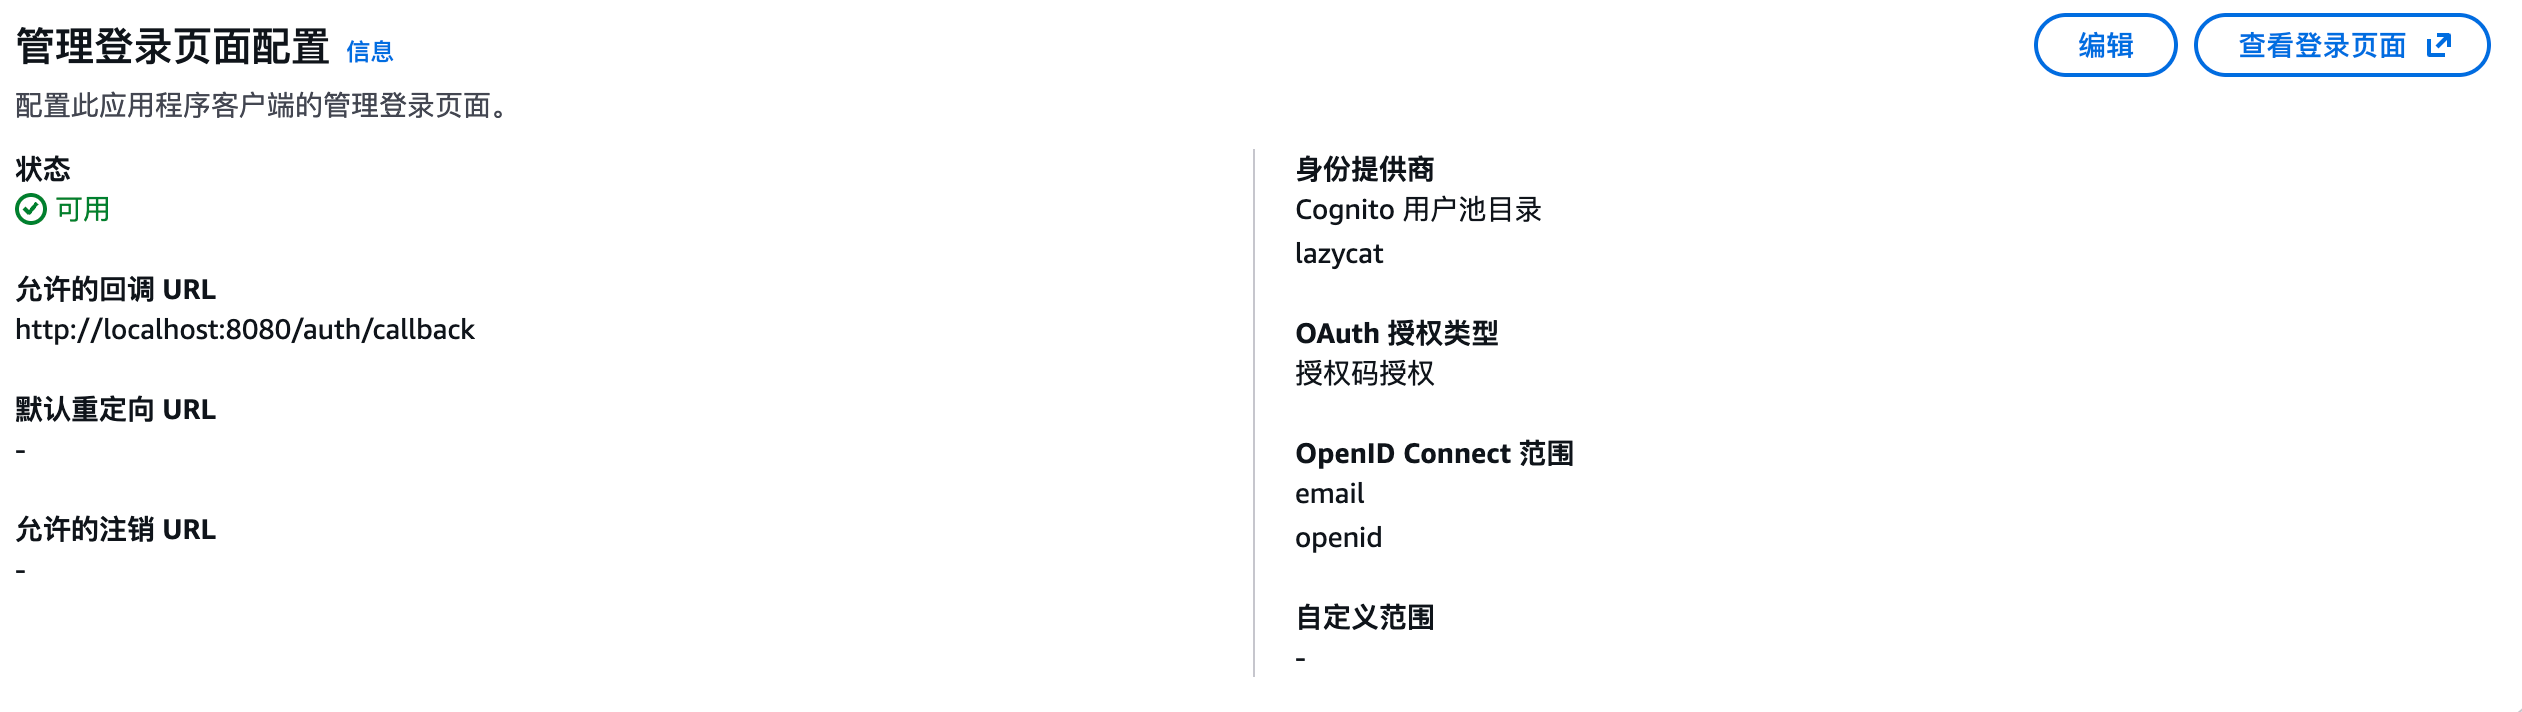
老规矩还是先使用懒猫SSO的API注册应用,当然这里的配置仍然保存在内存中,重启会丢失,所以就算一个拓宽的使用场景。使用 grpcurl 调用 CreateClient 接口,关键点在于配置 Cognito 的回调地址:
1
2
3
4
5
6
7
8
9
10
11
./grpcurl -plaintext -d '{ "client": { "id": "congnito", "secret": "congnito-secret", "name": "New Flask App", "redirect_uris": [ "https://<your-cognito-domain>.auth.us-west-2.amazoncognito.com/oauth2/idpresponse", "http://localhost:8080/auth/callback" ] } }' 172.18.0.2:5557 api.Dex/CreateClient
这样我们就配置好了Congito的回调,当然还有本地的localhost和127.0.0.1的回调。
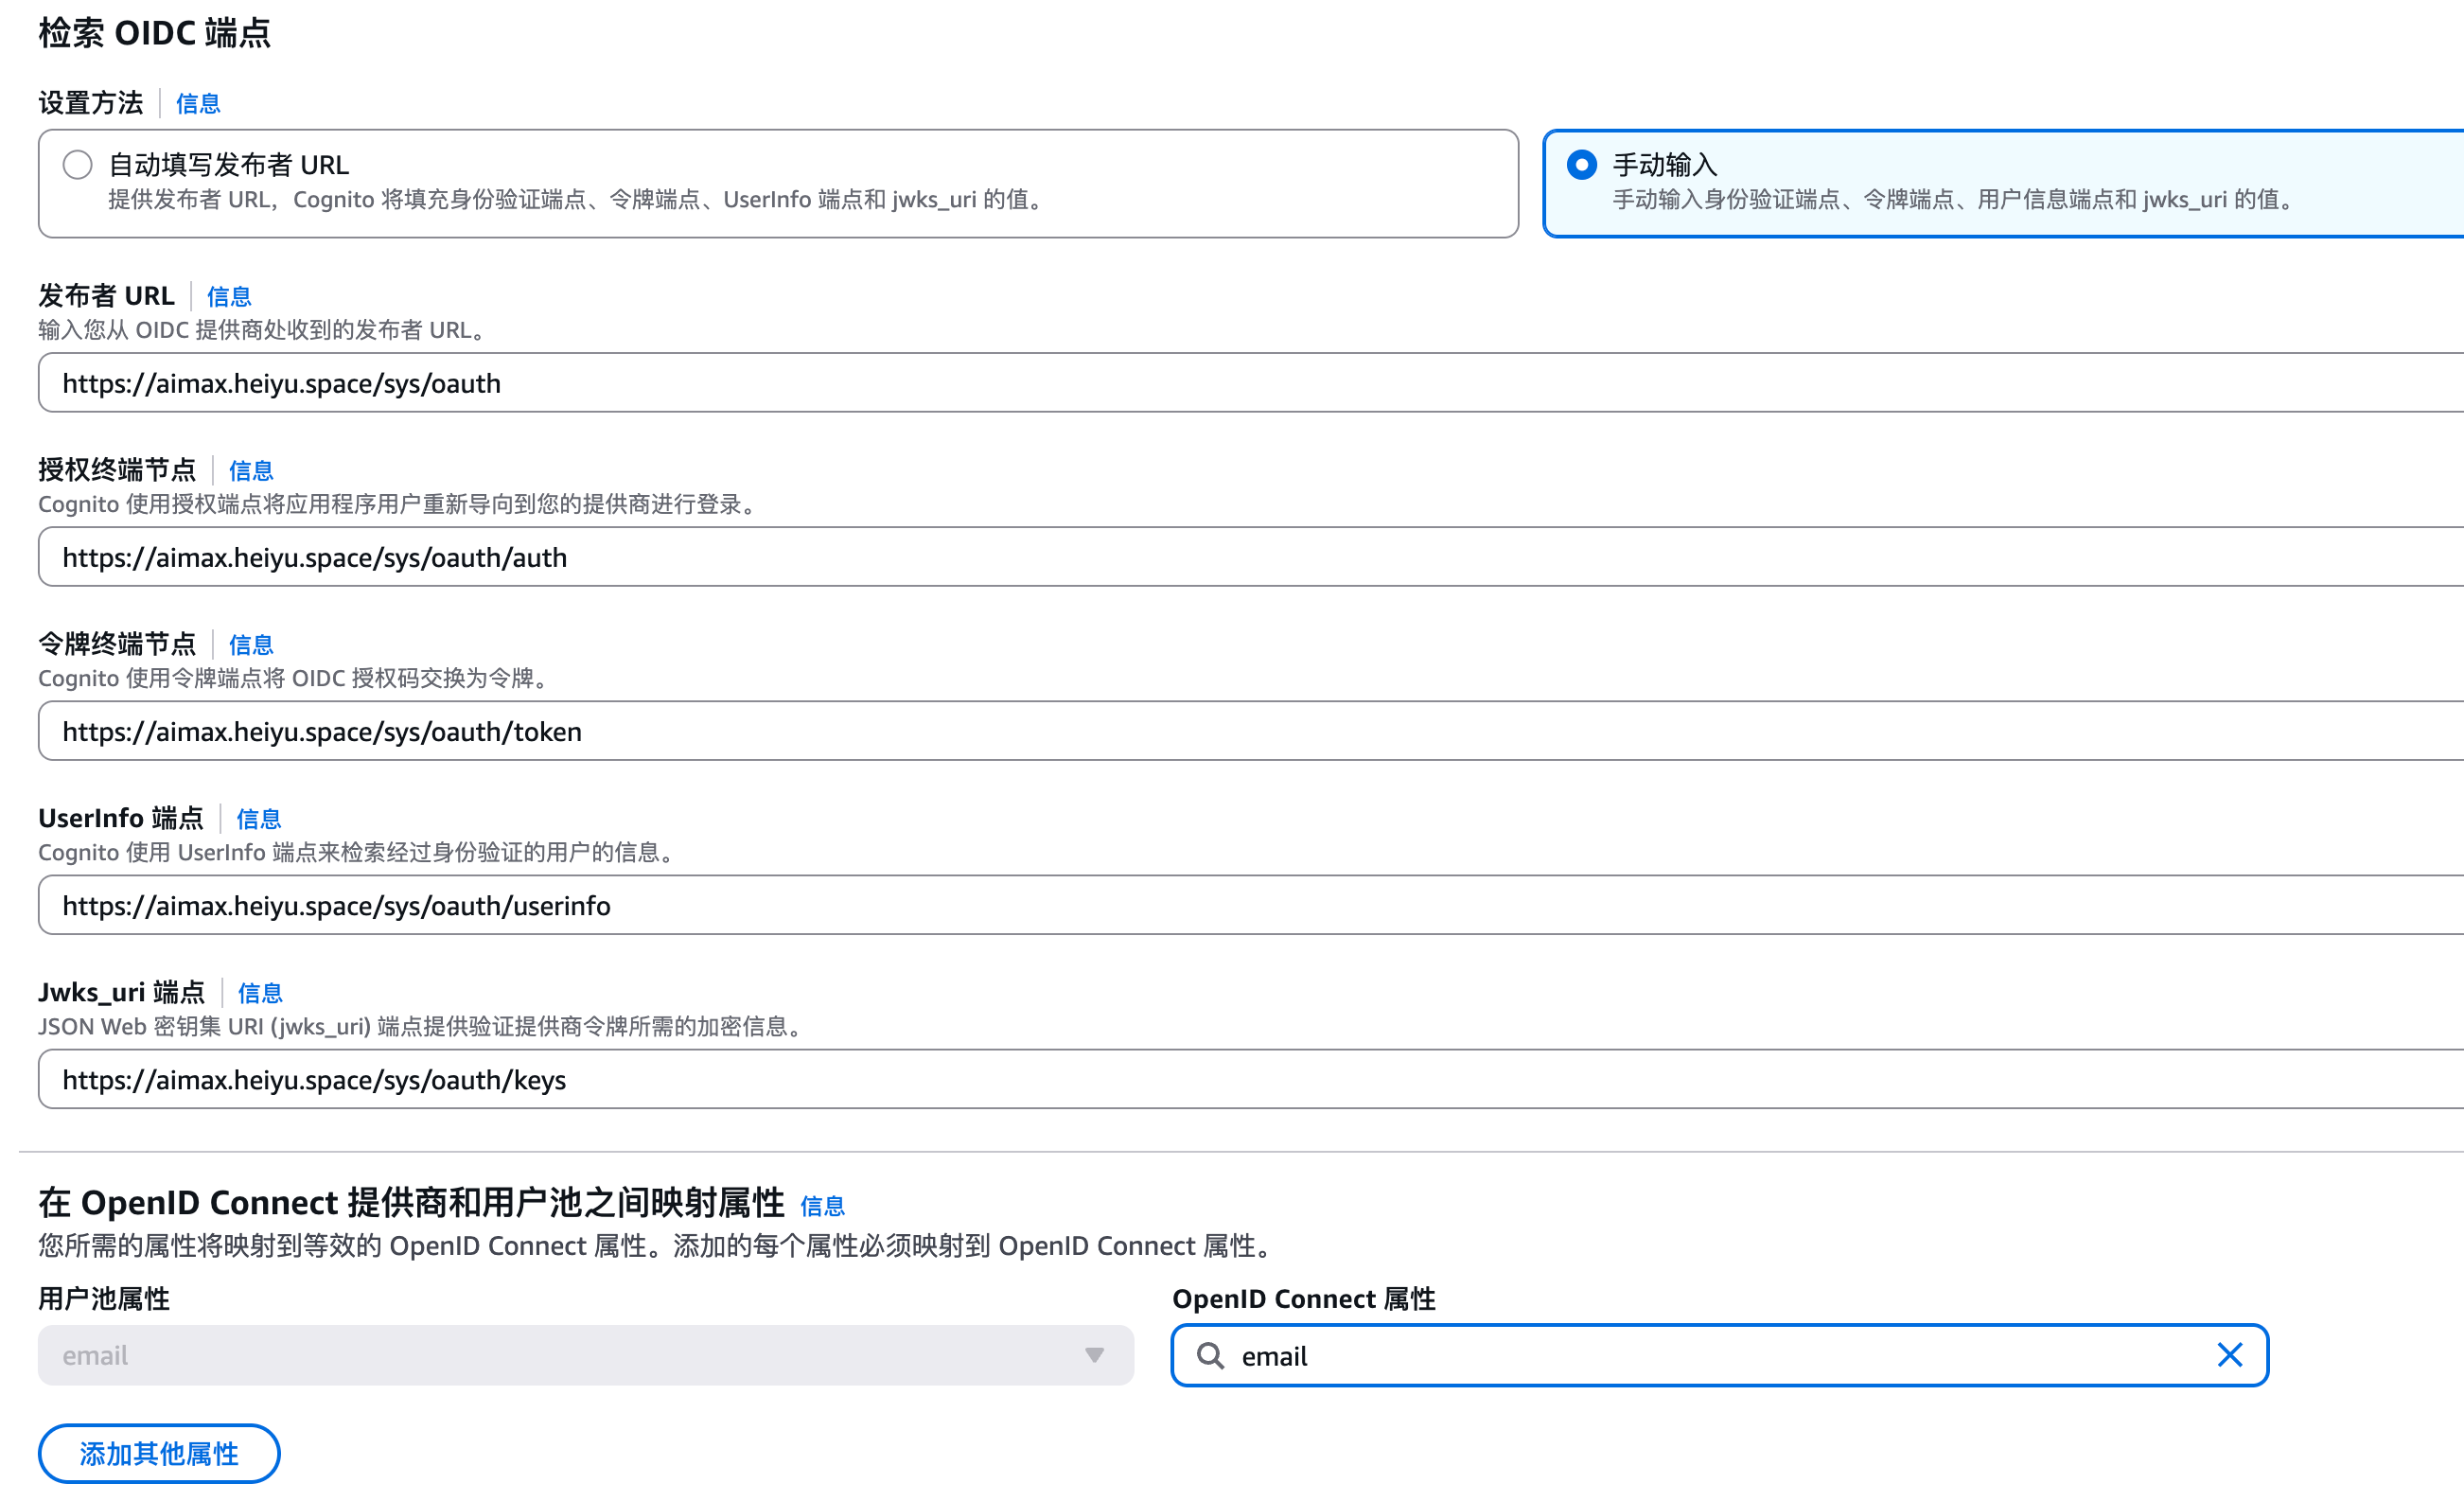
随后,在 AWS Cognito 控制台中新建一个 OIDC 提供商,填入对应的 client_id 和 secret。此时,Cognito 实际上成了懒猫 SSO 的一个“客户端”。
配置的时候Cognito提示无法解析懒猫域名,所以这里把URL分开来填写:
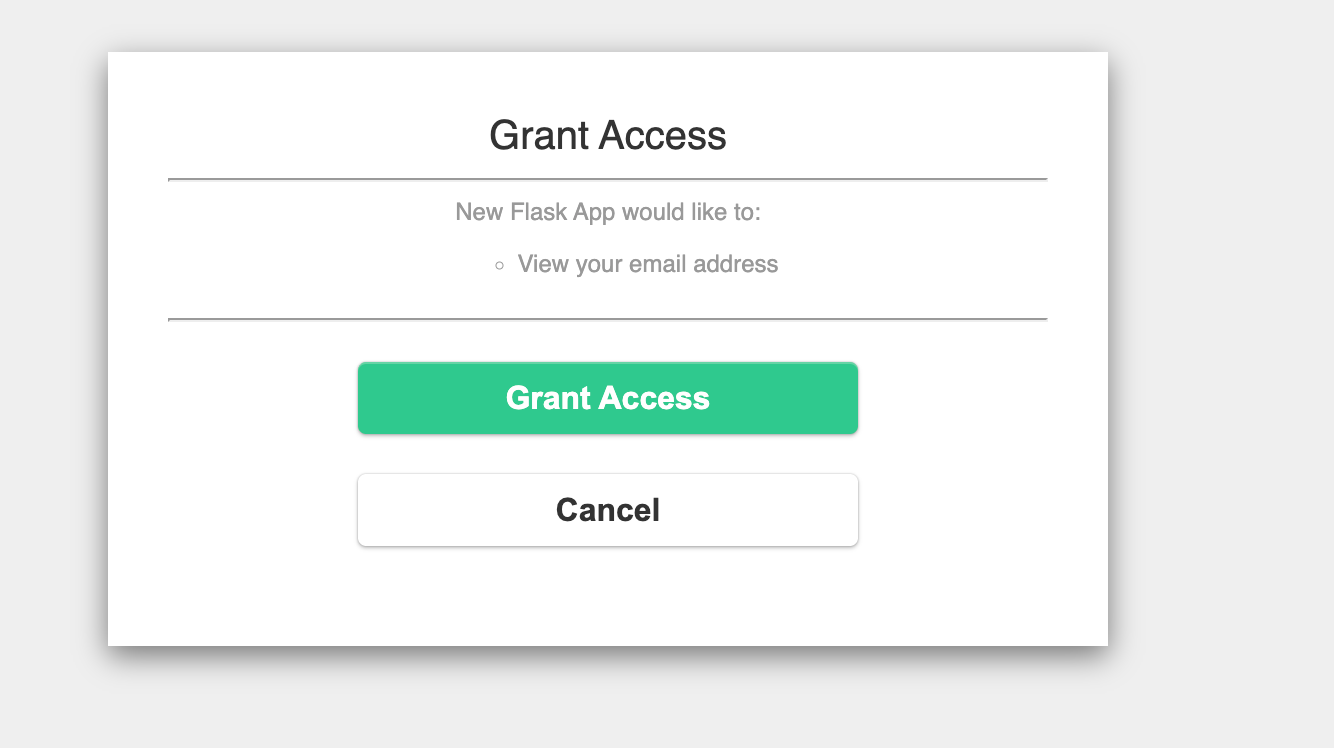
渐入:深入联邦身份原理 然后尝试代码如下,因为Cognito做了中间层,所以这里的信息是Cognito的,然后登陆的页面有一个选项可以跳转到懒猫SSO。
理想很丰满,现实很骨感。当我尝试通过 Cognito 页面跳转懒猫 SSO 登录时,程序报错了。
1
2
3
4
5
6
7
8
9
10
11
12
13
14
15
16
17
18
19
20
21
22
23
24
25
26
27
28
29
30
31
32
33
34
35
36
37
38
39
40
41
42
43
44
45
46
47
48
49
50
51
52
53
54
55
56
57
58
59
60
61
62
63
from flask import Flask, redirect, url_for, session, jsonify from authlib.integrations.flask_client import OAuth from functools import wraps import os app = Flask(__name__) app.secret_key = os.urandom(24) oauth = OAuth(app) oauth.register( name='sso', client_id='', client_secret='', server_metadata_url='https://cognito-idp.us-west-2.amazonaws.com/us-west-xxx/.well-known/openid-configuration', client_kwargs={'scope': 'openid email'}, ) def login_required(f): @wraps(f) def decorated(*args, **kwargs): if 'user' not in session: return redirect(url_for('login')) return f(*args, **kwargs) return decorated @app.route('/') def index(): user = session.get('user') if user: return f'Hello, {user.get("email", user.get("name", "unknown"))}. <a href="/profile">Profile</a> | <a href="/logout">Logout</a>' return 'Welcome! Please <a href="/login">Login</a>.' @app.route('/login') def login(): return oauth.dex.authorize_redirect( url_for('authorize', _external=True), identity_provider='COGNITO' ) @app.route('/auth/callback') def authorize(): token = oauth.dex.authorize_access_token() session['user'] = token.get('userinfo') session['token_info'] = { 'access_token': token.get('access_token'), 'id_token': token.get('id_token'), 'token_type': token.get('token_type'), 'expires_at': token.get('expires_at'), } return redirect(url_for('index')) @app.route('/profile') @login_required def profile(): return jsonify(userinfo=session['user'], token=session.get('token_info')) @app.route('/logout') def logout(): session.pop('user', None) return redirect(url_for('index')) if __name__ == '__main__': app.run(host='0.0.0.0', port=8080, debug=True)
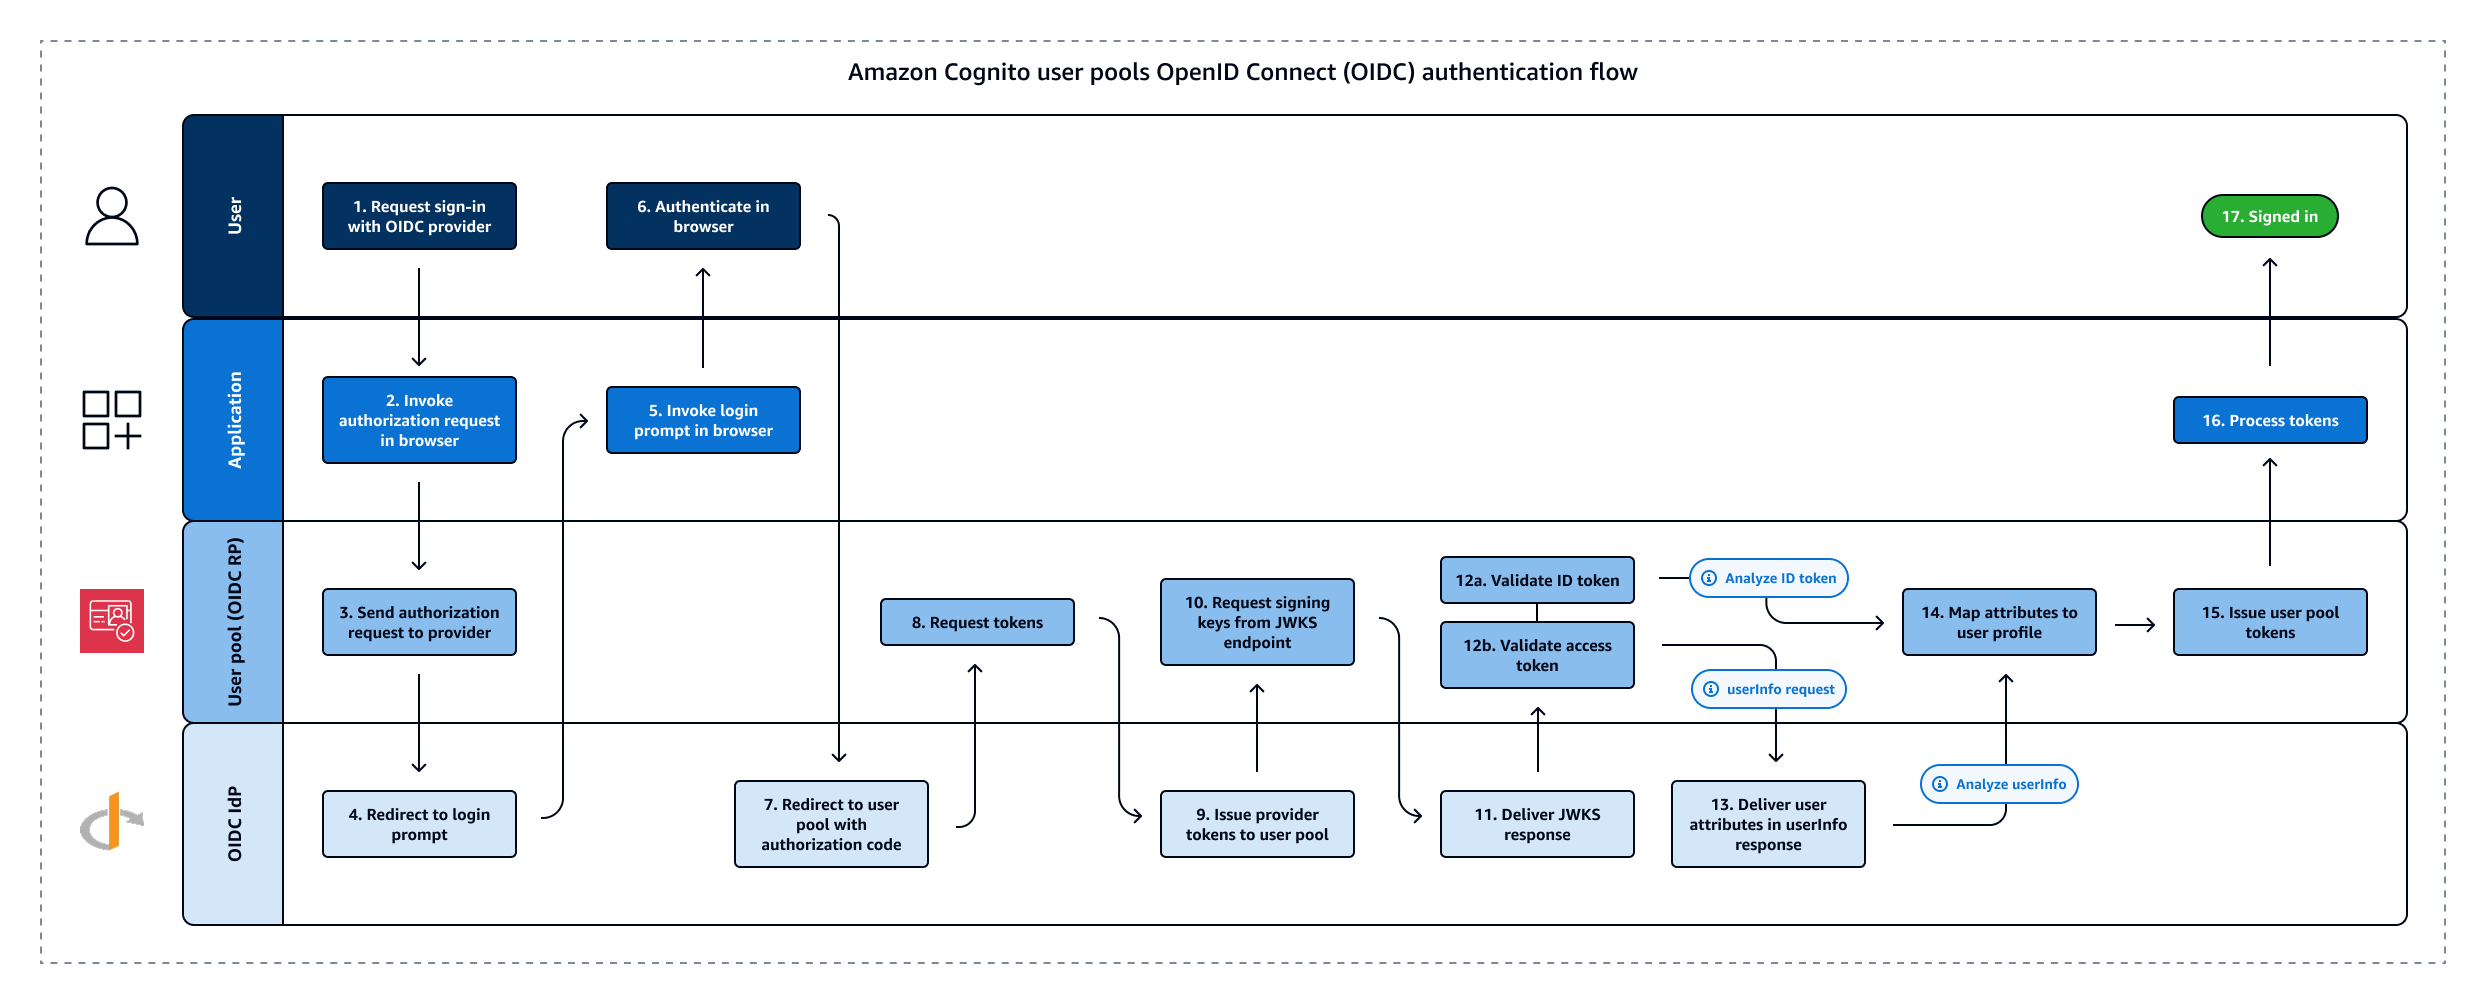
经过数天的排查,我定位到了问题的核心:网络隔离与双向通信。
但由于懒猫 SSO 部署在私有微服环境下,虽然我的懒猫微服能够访问互联网,但是Cognito 的服务器缺无法解析我的私有域名,更无法穿透内网进行通信,导致请求超时,最终我在日志中翻到了HTTP 400。
曲终:另辟蹊径的“重定向”方案 于是不甘心,想了一个折中的办法,是不是可以把这个跳转逻辑放到浏览器里来做呢?
直接让浏览器代替Cognito的跳转,多次尝试无果
在Cognito返回失败的时候捕获error,然后在本地302跳转到懒猫SSO
幸运的是方案2是工作的,虽然有种欺骗的味道,但是似乎是达成了公有的IDP外挂懒猫IDP的假象。首先把Cognito的注册都关掉,但是保留登陆功能,这样就没有人可以通过Cognito进行登陆,然后就只能点击懒猫SSO登陆,这个时候就会重新协商OpenID Connect协议,当我开启懒猫微服客户端的时候,我可以解析域名,别人哪怕能够跳转也无法做域名解析,所以很安全,其他人无法注册和登录Cognito,也无法解析懒猫微服域名。
1
2
3
4
5
6
7
8
9
10
11
12
13
14
15
16
17
18
19
20
21
22
23
24
25
26
27
28
29
30
31
32
33
34
35
36
37
38
39
40
41
42
43
44
45
46
47
48
49
50
51
52
53
54
55
56
57
58
59
60
61
62
63
64
65
66
67
68
69
70
71
72
73
74
75
76
77
78
79
80
from flask import Flask, redirect, url_for, session, request from authlib.integrations.flask_client import OAuth from authlib.integrations.base_client.errors import OAuthError import os import logging logging.basicConfig(level=logging.DEBUG, format='%(asctime)s [%(levelname)s] %(message)s') log = logging.getLogger(__name__) app = Flask(__name__) app.secret_key = os.environ.get('FLASK_SECRET_KEY', 'dev-secret-key-change-in-prod') oauth = OAuth(app) oauth.register( name='cognito', client_id='', client_secret='', server_metadata_url='https://cognito-idp.us-west-2.amazonaws.com/us-west-xxx/.well-known/openid-configuration', client_kwargs={'scope': 'openid email'} ) oauth.register( name='dex', client_id='Congnito', client_secret='Congnito-secret', server_metadata_url='https://x.heiyu.space/sys/oauth/.well-known/openid-configuration', client_kwargs={'scope': 'openid email'} ) @app.route('/') def index(): user = session.get('user') if user: return f'Hello, {user.get("email", user.get("sub"))}. <a href="/logout">Logout</a>' return 'Welcome! <a href="/login">Login</a>' @app.route('/login') def login(): session['provider'] = 'cognito' redirect_uri = url_for('callback', _external=True) return oauth.cognito.authorize_redirect(redirect_uri) @app.route('/auth/callback') def callback(): provider = session.get('provider', 'cognito') log.info(f'Callback - provider: {provider}, args: {dict(request.args)}') # Cognito 失败,fallback 到 懒猫SSO 直连 if provider == 'cognito' and request.args.get('error'): log.warning(f'Cognito failed: {request.args.get("error")}, falling back to Dex') session['provider'] = 'dex' redirect_uri = url_for('callback', _external=True) return oauth.dex.authorize_redirect(redirect_uri) try: client = oauth.cognito if provider == 'cognito' else oauth.dex token = client.authorize_access_token() session['user'] = token.get('userinfo') session.pop('provider', None) return redirect(url_for('index')) except OAuthError: if provider == 'cognito': log.warning('Cognito token exchange failed, falling back to Dex') session['provider'] = 'dex' redirect_uri = url_for('callback', _external=True) return oauth.dex.authorize_redirect(redirect_uri) raise @app.route('/logout') def logout(): session.pop('user', None) return redirect(url_for('index')) if __name__ == '__main__': app.run(debug=True, port=8080)
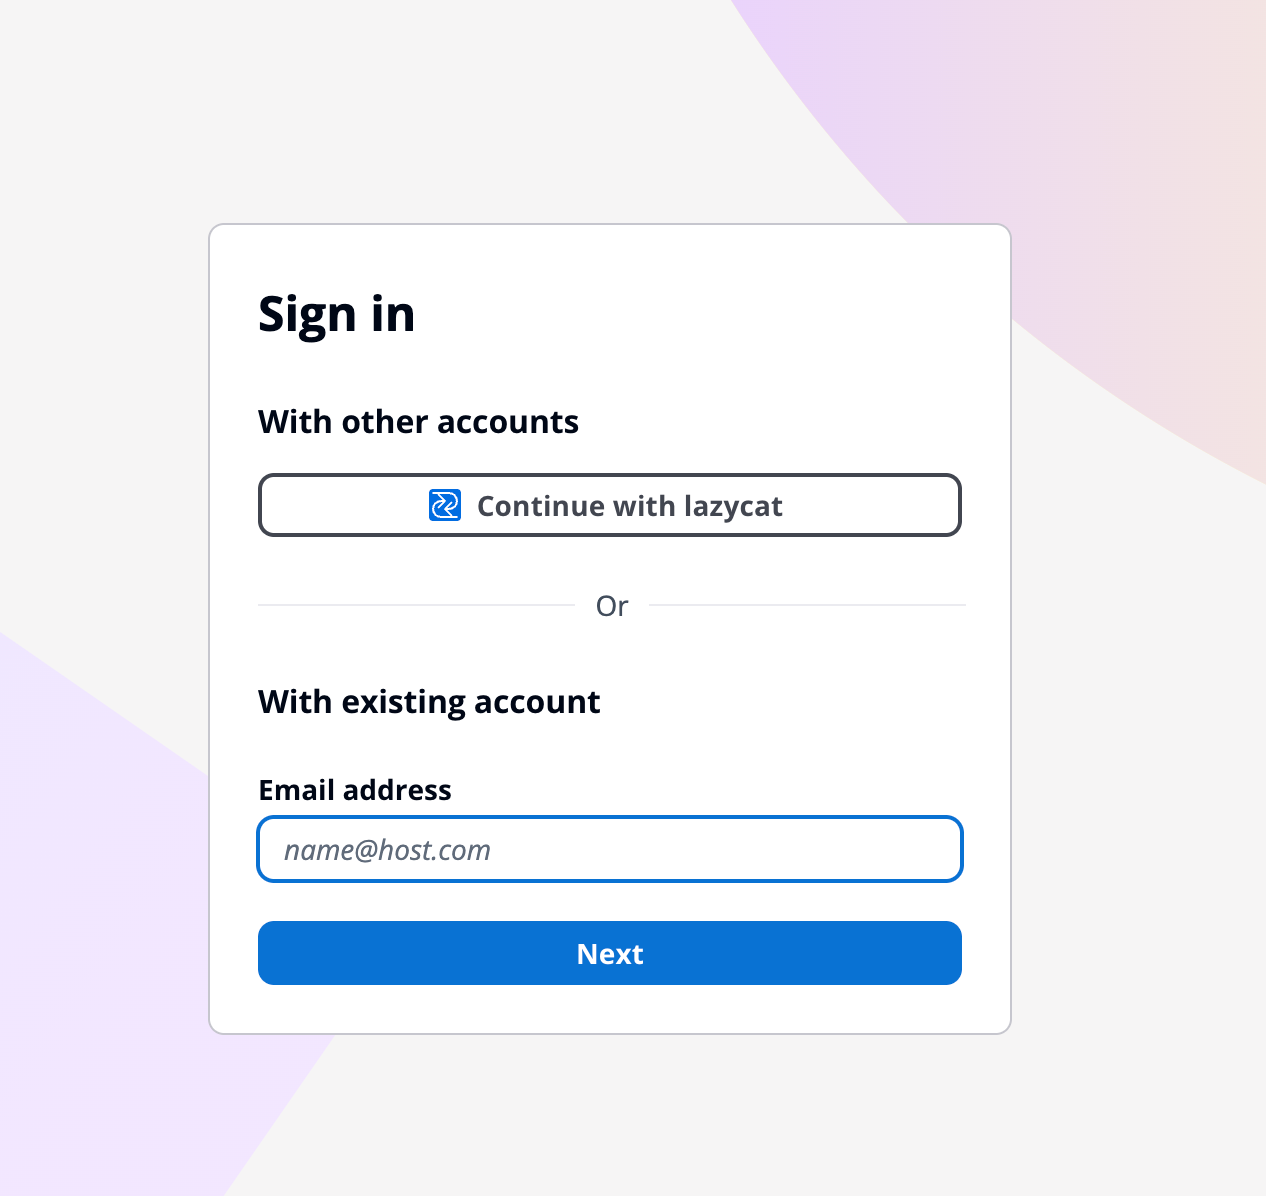
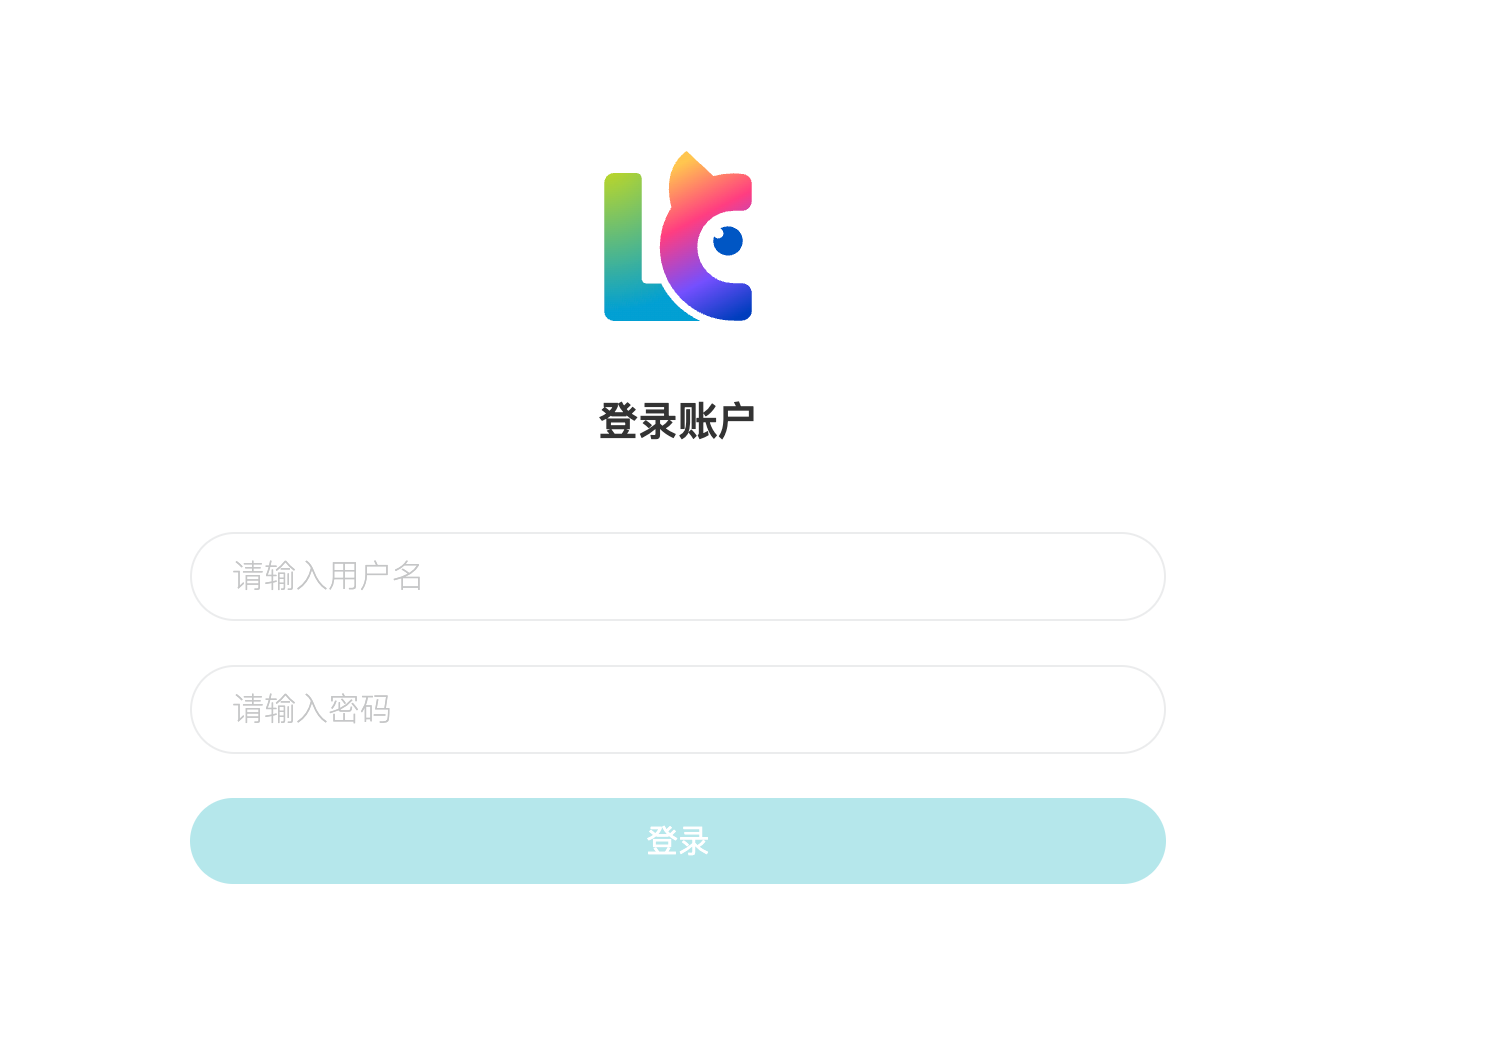
别急,如果你看到了这个页面只能说是域名跳转成功,并不是OIDC的凭证交换。
输入用户名和密码之后出现这个页面就对了:
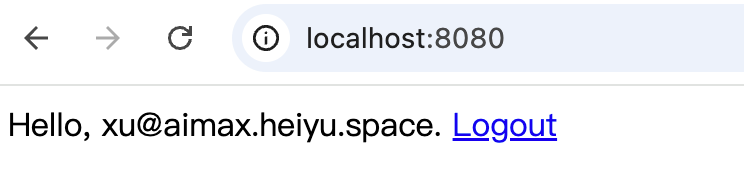
登陆之后就换到claim信息了,可以看到打印出来了邮箱。
总结 没白折腾,确实还挺抽象的,抽空又复习了Oauth和OpenID Connect的底层原理,通过使用懒猫SSO,我的技术栈又升级了。


 微信
微信 支付宝
支付宝